CRM Email Import – Customer Contact History and Archiving
This tutorial describes the CRM email import of emails from your personal mailbox and how they are automatically linked to records in CRM. In addition, the filter functionality is explained, with which you can filter which emails from your mailboxes should be considered.
Creation of the email box
Every CRM user has to carry out this activity if you want the emails of the employee to be linked to the sales opportunities, prospects etc.
PS. It is also possible to create group email accounts and assign them to a team in CRM. This allows in example a sales team import from a group email account. Each member of the CRM team has access to these emails in the CRM system and the assignment to a lead happens only once!
This article describes how to integrate a personal email account. For the integration of group email accounts, please contact your administrator.
Open your CRM system via your portal or open directly the URL crm.cloudmonki.info (replace cloudmonki.info with your personal domain) and open the section E-Mails

In the email module you have to choose the menu item “Personal Email Accounts” via the 3 dots.

Then select “Create Email Account”

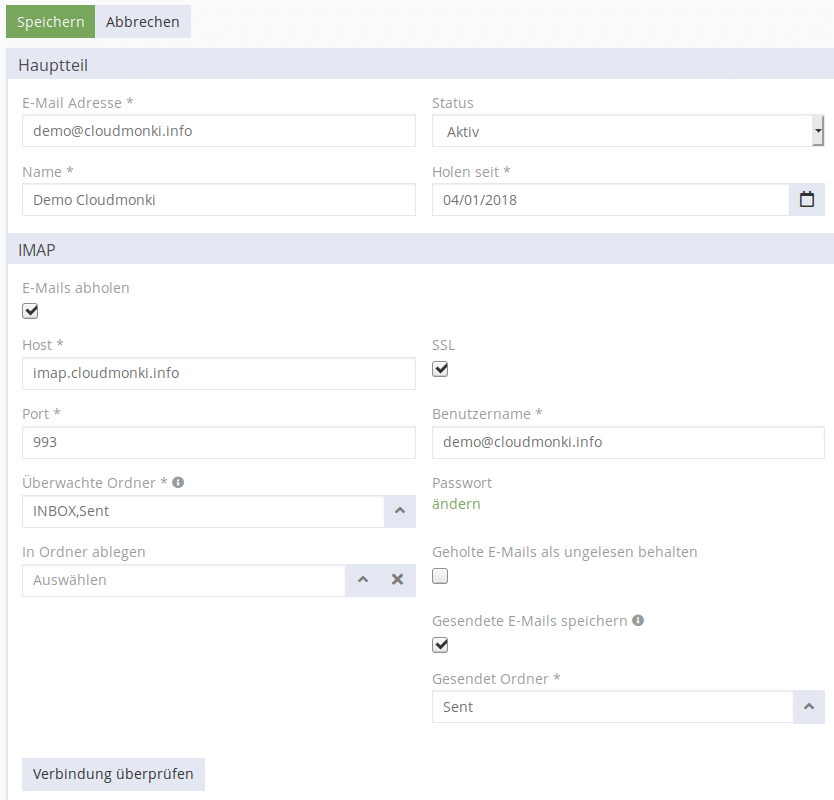
In the following mask, please define the following fields

Fill in the fields as described above with your personal Emailbox data. Replace the domain cloudmonki.info with your personal domain.
Monitored Folders: Decide which folders of your emailbox should be monitored, all new emails in the selected folders will be imported. Hint: If you want to import only customer-relevant emails into the CRM system, it makes sense to create a folder “Customers” below the inbox on your email server. Move all customer-relevant emails from the Inbox to the new “Customers” folder. Then choose here in the CRM system the import of emails from the folder “Customers”.
Store sent emails: Select the mailbox folder where emails should be saved when you write emails directly through the CRM system. This allows you to find the sent mail later among the sent emails in your mail client.
Once you have made all the settings, you can test the connection by clicking on “Test connection”.
If everything is OK select “Save” in the upper left corner. The import of emails should begin immediately.
The CRM system carries out an automatic allocation to sales opportunities and so on. The system compares the email addresses from the incoming emails and the email addresses that you have assigned to prospects and contacts. If the CRM Email Import does not work as desired, please contact your administrator.
Filters
Filters serve to e.g. suppress unwanted emails when importing from Email Server.
After the mailbox has been created in CRM, filters can be created. Click on the plus sign in the “Filter” section.

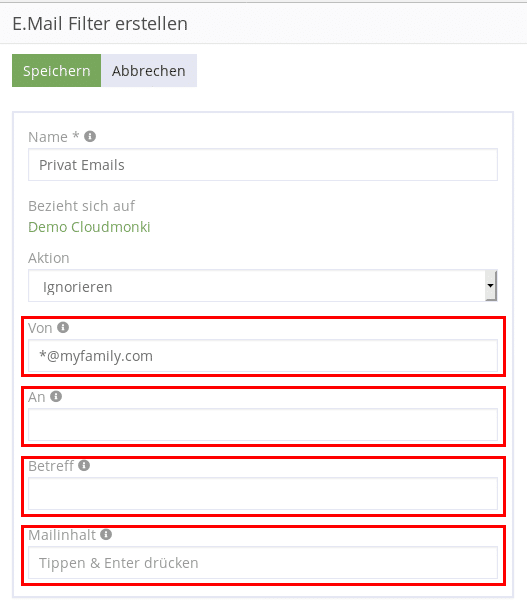
In the following mask you can define which contents should be checked.

From: Mails from these senders are not imported.
To: Mails to these recipients are not imported.
Subject: Mails with the specified subject will not be imported.
Body contains: Mails with the specified content will not be imported.
Remember: Wildcards with * are also possible in each case, like e.g. *@myfamily.com considers all email addresses of the domain myfamily.com.
After successful definition, click on “Save”.

